espańol
-français
-italiano
Egyptian Postures
Extract from Revised Edition of THE POWER OF BREATH by Humata Verlag, Switzerland in 1958
page principale
... mazdean science
...Health and breath culture

FOREWORD
For many years, and ever since the introduction of HEALTH AND BREATH CULTURE we have been prevailed upon to publish and illustrate EGYPTIAN POSTURES, that the farther advanced pupils may follow the trend of their promptings unto still higher attainments, since upon the Plains of Progression there can be no final, but a continuity of efforts. But, as repeatedly assuring our Students, we have never had an intention of directing our talents toward literary pursuits, our intention has been to simply voice subjects of interest and value, leaving the wording, arranging, transcribing and systematizing to those, who have been particularly gifted in that direction. True, some have made an attempt, but insufficiently versed in Subjects of Scientific Principles and Measures, have too hurriedly offered to the world what they themselves have never tested or experienced, thus creating a mass of complications. The Spirit of our Times demands thoroughly tried, efficient, demonstrable and simple methods, be it on lines of physical, mental or spiritual development.
Physical culture, Body culture, Swedish and Rhythmic movements may be practically new to us, and be more or less unscientific in theory and practice, but Scientific Gymnastics have run parallel with people of a civilized type. Wherever Scientific Gymnastics become a part of daily regime, whether observed by the stalwart Roman for physical handsomeness, the Greek for philosophical reasons, the Egyptian unto higher spiritual attainments, matters little, as in either and all cases the pneuma, the spiritus, or the breath constituted the impetus unto bodily movements or pantomime.
The Romans copied the Greeks, the latter the Egyptians, and into Egypt everything of note and value poured, as streams empty into the mighty ocean that receives them with open arms, since Egyptians believed in absorption. Here then are found the higher and refined schools in scientific healing, philosophy and religion, where the system of education is brought down to a minimum, meeting the demands of the threefold nature of man. The curriculum of academic learning consisted of evolutionary developments and innocent sports rather than the sweating system of lecture torture. Even in our days the students follow sports, although crude in nature, because of the little interest shown by the faculty, and we can thus account for the lack of scientific measures.
In offering the EGYPTIAN POSTURES we hope to fill a long-felt want, meeting the demand in part at least, if not in whole. True, we do not enter into any details, satisfying the unsatiable critic, who confines himself largely to theory and surface. To meet every invalid mind, with the purpose of sweeping off cobwebs of antiquated learning, would require volumes of writings. Suffice it to say, that after thorough practice of the Twelve Lessons on HEALTH AND BREATH CULTURE the EGYPTIAN POSTURES, will more than convince the most sceptic of their efficacy, and although simple in their appearance, the execution of each Posture, in their order as given, will prove their worth better than all the spear-pointed arguments.
In taking these Postures we should always bear in mind, that in as much as all the exercises in HEALTH AND BREATH CULTURE must be taken on the breath, if good results are to be immediately obtained, even so the EGYPTIAN POSTURES are not only to be taken on the breath, but be accompanied by music and song, in the higher or mental sense at least, applying humming, that the more difficult poses may be readily mastered.
All POSTURES are poses, more or less, and it is necessary that the gymnast remain in each pose long enough to feel perfectly relaxed, poised and confident.
Before attempting the practice of EGYPTIAN POSTURES it may be well for the gymnast to study the illustrations carefully and recall to memory all he has learned in anatomy and physiology. Thereafter take the positions in the order given and in the manner described.
Students of Egyptology will recall to mind some of the Postures and remember that the Egyptian Physician, Priest or Judge prescribed to the needy Postures for the healing of sickness, sin or deficiencies.
Although lost sight of for a time, the study of Archaeology has revealed many treasures of former accomplishments, and what heretofore appeared as mere embellishments, or meaningless idols of stone or wood, now disclose their original purpose, posing as Saints in their sacred attitudes assuring perfection in all things by following in their divine footsteps, thus fulfilling the part we have so long sought.
May then the Ideals (idols) of the Ancients, born of good endeavor, prove unto mutual understanding and wrought in us the gold of virtue that alone can free us from entanglements of error, and place us where talents may be utilized to best advantage.
With showers of Blessings,
OTOMAN, PRINCE OF ADUSHT.
POSTURE LESSON
Every civilization has its sports, its religious rites or its entertainments, calculated to stir the mind and stimulate the body to greater action through the circulatory and nervous system.
Every phase has much in its favor when rationally considered, and discloses great wisdom on the part of Nature to further the purifying process that made the human developments possible, to the extent of sharp lines of demarcation, separating one generation from another not only as to customs but as to mental possibilities, so much so that with the development of each successive generation greater endowments become embodied, making life's most perplexing problems as solvable as the fading of stars at the break of day.
Up to the present generations this purifying process has become quite evident and wherever ambition unto higher attainments asserted itself, there man would seek to discover Nature's only and infallible means unto human developments conducive to higher culture. The Egyptians, a high developed civilization, recognized the importance of the blood through dynamic action and discovered in a more general way the necessity of equal and corresponding development of the mental inclinations to that of the bodily functions, not only to assure health of body and mind, but to gain control over all the spiritual attributes, assuring perfection. The heart, as the center of the circulatory system, with the dynamics directing the ganglionic operations, distributes the blood in accordance with the fineness of its texture to whatever part desired, and according to the chemical operations induces thought waves communicative with mind and its concept. The Ancients seemed to have understood the physiological modus operandi of heart and mind when they said: "From an impure heart flow evil thoughts."
The Egyptian Postures have it for their purpose to increase chemicalization of Though-waves and with it the refining of the Blood, which assures refinement of the Heart so necessary unto higher culture and greater attainments.
These various positions give us the opportunities to gain control over our bodies through exercises and acquaint ourselves with all its parts and their operations, making us able to call out through the power of the mind the intelligence that lies hidden within the very cells, to bring into harmony all the tissues. You have to practice and discover the point of relaxation for yourself. This is of inestimable value because the air that rushes into the vital parts of the lungs is being retained. The more consciously we retain the substance that is within the air the more we can say we are fed by the spirit substance. This substance can not be explained, it is the unseen hand, the force and power of God. It is everything that is beyond the material mind, God beyond our senses. It will be necessary to breath more, and through the breath our spirit rises and we gain control.
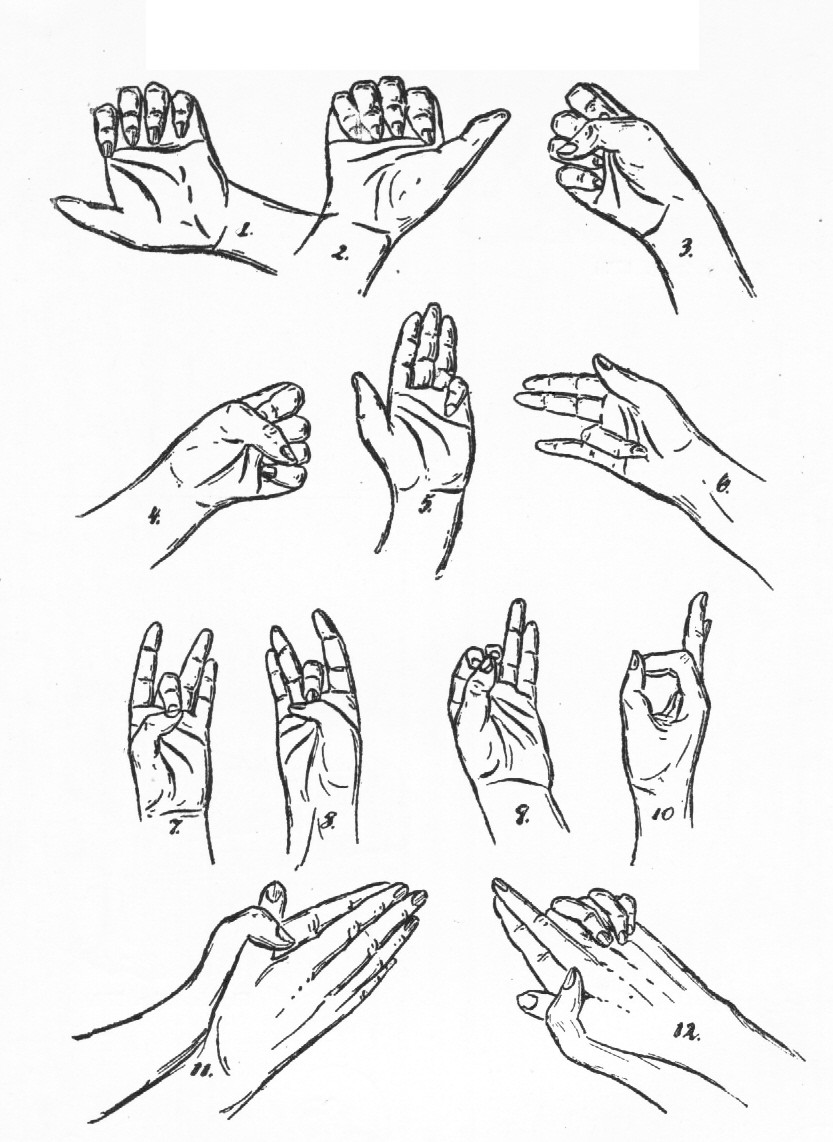
Before taking the Postures proper we would advise the Finger-exercises as given in the plate and follow them in regular order down to the First exercise, applying the Rhythmic Breath at all change of positions. Retain each position long enough to feel that the exercise is aiding you in conquering weakness. Use every relaxed effort to hold all other fingers in perfect line, while the one finger points into "the hollow thy hand."
Best results from these exercises are obtained in the early morning and upon an empty stomach, adding greatly to the development if taken in the open and in concerted action, where harmonic surroundings may be observed.
After some attention to the various positions of the fingers, the fist, the wrist, the elbow and the arm it will be found that in the waking state the muscles readily tense more, and that for this reason we have to arouse ourselves to adjustment. A tense state means loss of energy. Scientific exercises, prompted good judgment and reason, are calculated to check undue loss and build up the human mechanism to an extent of assuring satisfaction and success.
Further attention to the diverse postures will reveal to the religious practitioner that diverse organs of the body are quickened to a more normal action assuring stimulation and with it further development of bodily and mental functions, in which the epiphysis, or pineal gland, the spinal cord, the solar plexus and the sympathetic nerves play an important part.
As the Fist predominates in these Postures observe position of fingers; draw them in closely, so as to fold the tips with the mounts over the heart line and lastly head line, set them firm and tight. Now press the thumb upon the second phalanx of the second, third and lastly fourth finger, at the same time keeping the fingers in their original position. The thumb is to press tightly, while fingers, hand, wrist, elbow, arm and shoulder relax that the biceps and triceps may have freedom of control and the mind become at ease to use its talents and gifts.
FINGERS EXERCICE
POSTURE SET ONE
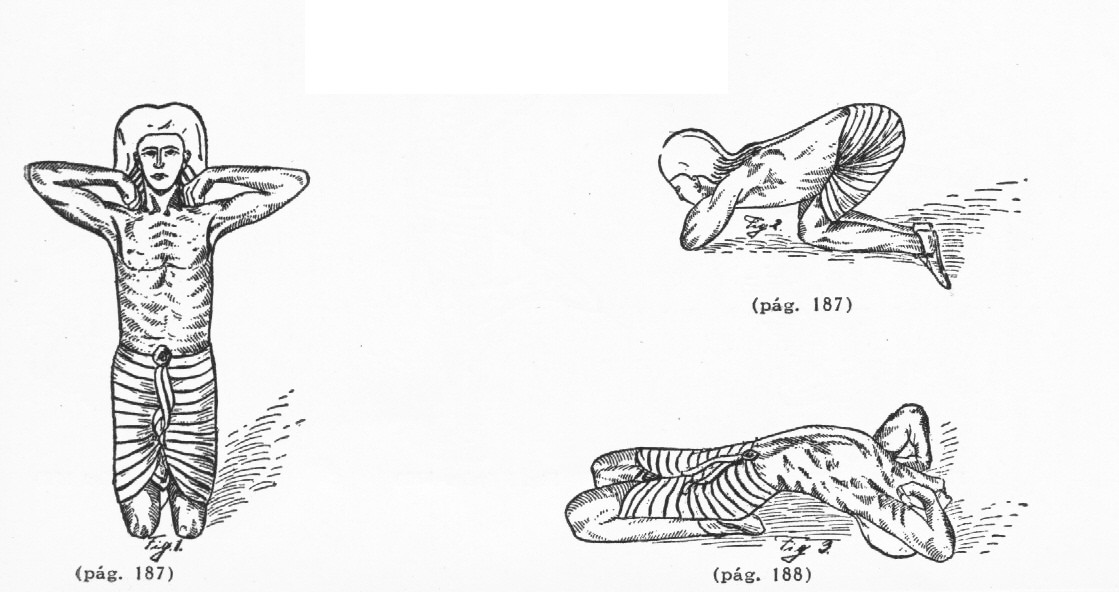
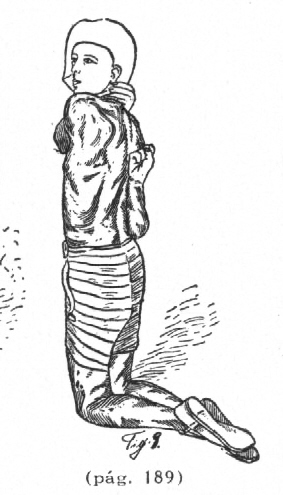
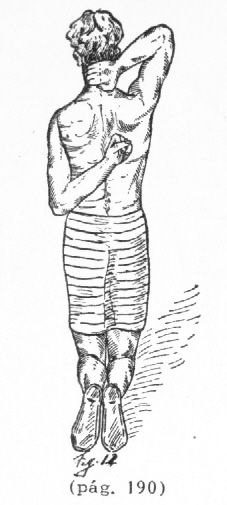
(Fig. 1) Is the introductory position used in all Kneeling Postures. The features in this position are the perfect lines drawn by deflation of abdomen until the floating ribs are drawn to a tightness, compelling the chest to expand to the utmost point. This gives freedom to the lungs to move in the immovable chest cavity at will, eradicating all adhesions, assuring limbemess to shoulder joints and arm sockets, giving the face a most pleasant expression; for pleasant we must look and pleasant we must feel. The next point to be observed is the looseness and freedom of the neck. Then the placing of the fist according to fist illustration on page 201, taking care that every hint is followed, as much depends upon the right setting of the fingers and the thumb of both hands, owing to the fact that the nerves are not only stimulated through these positions but quickened to a more normal and eventually a greater ganglionic generation, charging the system with healthier chemicals, inducing better thinking.
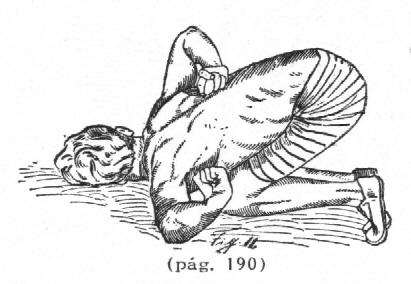
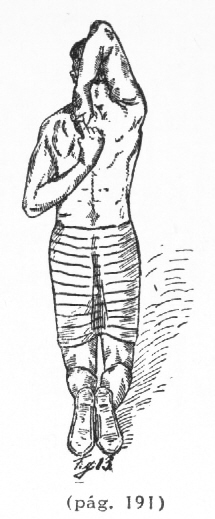
(Fig. 2) Kneel down, make fists, and place them close to neck, but resting upon shoulder groove. Empty the lungs to the utmost; arrest all action for a few moments. Now fill the lungs and while retaining the breath, bend the body forward, touching the floor with forehead at first and later with chin, remaining in that position as long as possible. Returning to original position, exhale and run of the scale ha, ha, he, hi, hu, hu, ho, ho, according to the French or German, using no effort whatsoever. Release the hold of fist only when prompted to do so, and then relax the fingers just for a few moments.
(Fig. 3) Retaining the same position as in (Fig. 2), inhale, retain the breath, and bend as far back as you can, exhaling as you return to original position, while humming a tune. It may be well to pile a stack of books behind one, removing one book after another each day, and until head comes to rest upon the floor. With each day lengthen the time of retentment.
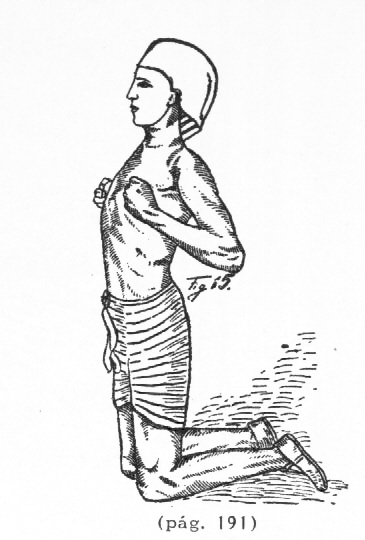
(Fig. 4) Take to original kneeling position and keep fists in same place, taking care that fingers and thumbs are placed tightly. After thorough emptying of the lungs, which should be done by humming an appropriate Health or Peace tune, arrest all breath action for a few seconds and then fill the lungs to the utmost; arrest all breath action and bend body as far to the right as possible and until the right elbow touches the floor, retaining gracefulness as to the lines of the body and expression upon the face. Returning to the original kneeling position, empty the lungs while humming the Harmonic scale or an appropriate tune.
(Fig. 5) Same kneeling Position; keeping the clenched fists tight against the shoulder joint. Always empty lungs thoroughly, arrest breath action for a few moments. Fill lungs with ease, while chest is well set. Arrest all action and bend body to the left and until left elbow touches the floor. Hum a sweet tune when returning to original kneeling position. Do not release fists from their position. Continue to clench fingers and press thumbs.
Having gone through these positions until they become easy, take all four positions in rapid succession and upon one inhalation.
This done, take each position upon an exhalation; and thereafter all four positions upon one exhalation, which means to say, you hum a melody until lungs are thoroughly emptied and then go through the movement and movements.
POSTURE SET TWO
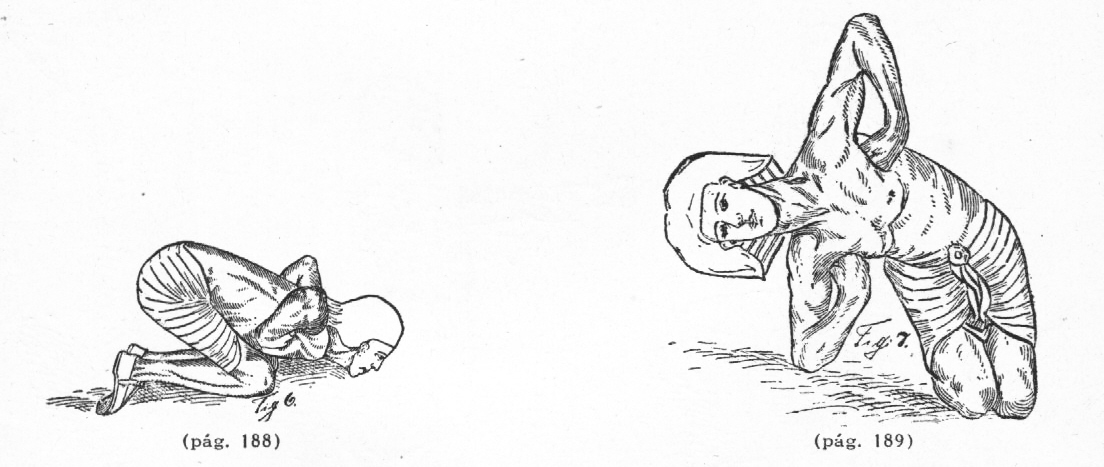
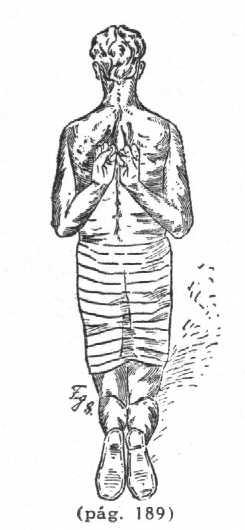
(Fig. 6) This position is identified with Fig. 2 in POSTURE SET ONE but constitutes a new series owing to the difference in the effect upon the nerves. Here the fists are placed and dug deep into the arm pits, controlling and keeping thumbs tightly to the lines set. Study the illustration carefully. The emptying of the lungs upon a melody and filling same remains like in former POSTURE.
(Fig. 7) All the former instructions are to be observed. After the Forward movement the Backward movement follows. Then the Side movement with right elbow touching the floor, followed by the left elbow. Note the difference in the lines of muscles when compared with Fig. 4, where the fists rest upon the shoulders instead of under armpits.
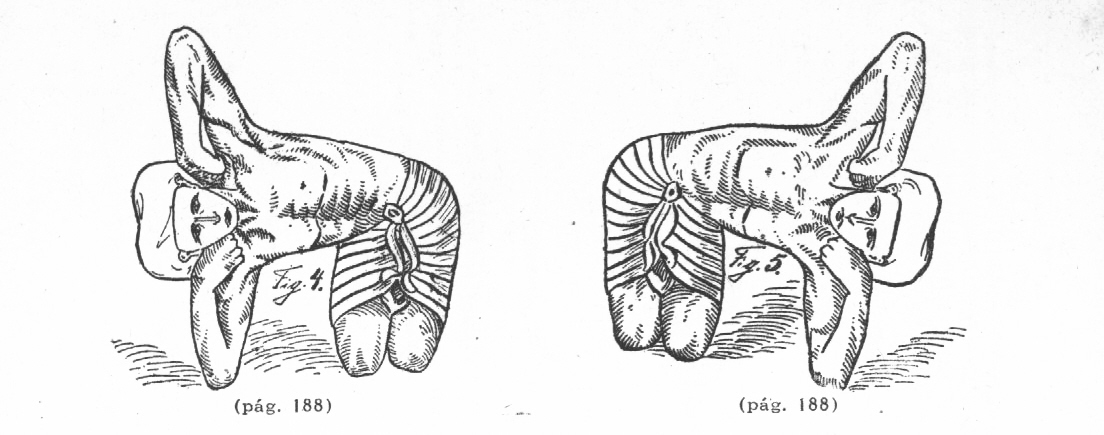
POSTURE SET THREE
(Fig. 8) Applying all previous instructions, place first one fist, then the other between shoulder blades and until both fists meet. The nearer the shoulder tips the better. As soon as fists are adjusted to the highest possible point take the Forward movement with chin touching the floor, followed by the Backward movement, the back of head or crown touching the floor; then the Side movement in which the right elbow touches the floor, followed by the Side movement where the left elbow touches the floor; applying further instructions as given in the last two paragraphs of Fig. 5.
Remember, that all tension is due to inattention. If chest is kept in place and neck held freely, while all the muscular force remains in the fists, a strange relaxation throughout the body will be observed. The cracking of joints need not alarm us.
POSTURE SET FOUR
(Fig. 9) While the right fist rests between shoulder blades the left arm is swung in front while the left hand reaches the left ear from behind, giving it a yank as the head turns and chin rests on left shoulder. Now reverse fist and hand, chin resting upon right shoulder. These two features accomplished, perform same while taking the Forward body movement, the Backward, left and right Side movements described in POSTURE SET ON.
POSTURE SET FIVE
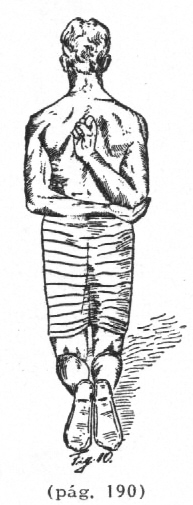
(Fig. 10) Run up the spinal column with right fist, the elbow resting in the palm of left hand, which is to push the right arm toward the seventh vertebrae, remaining in that position for at least one minute, humming a sweet tune. Reverse arm and hand, adding the four positions given in POSTURE SET ONE.
This done, relax arms and hands quickly; lift arms high above head and take the quick wrist shake, moving wrists to right and left for at least twelve times. Then bring arm horizontally in front of you and shake hands which must be limp from the wrists down. Now draw arms toward yourself, shaking hands before your face as if fanning. Take both, the right and left wrist movement
POSTURE SET SIX
(Fig. 11) Place left fist under arm pit. The right fist as far up the spinal column as possible. Pound along the spine, from fifth vertebrae down to coccyx, and all over the back; then reverse position of fists. Go through the four positions described in SET ONE and TWO. With face on floor, as in Fig. 10, attempt to touch shoulder with your chin, using effort, if needs be, to pound the back.
POSTURE SET SEVEN
(Fig. 12) Left fist up the back, while the right pounds the nape and all of the back neck, the shoulder blades and between them. Reverse positions of fists. Add positions of SET ONE, TWO and FIVE. Finish up with last paragraph of SET FIVE.
For especial stimulating effects which will prove nerve quickening, place the elbow of the right arm into the hand of the left arm which is brought around to the right side of the body across the back. With the right fist manipulate every part of the body, even down to the knees, calves and ankles. Reverse position; also adding Forward, Backward, left and right Side movements, and finish up with last paragraph in SET FIVE.

POSTURE SET EIGHT
(Fig. 13) Kneeling posture. Bring left arm under left shoulder and up the spine, while the right arm is brought over the right shoulder, and between shoulder blades. Here one finger of each hand link, going through linking with all the fingers; then all the fingers of both hands grip tightly into one another. This accomplished reverse positions of arms.
This done take the Forward, Backward, the left and right Side movements, while hands are linked.
(Fig. 14) Standing position at first. Place arms and fists as in Fig. 13. Have corresponding knuckles of fists brace each other tightly. As soon as successful in this feat, perform this knuckle bracing in the Kneeling posture, taking the Forward, Backward, the left and right Side movements.
POSTURE SET NINE
(Fig. 15) Kneeling position. Place elbows tightly into hips; with fists hit chest harder and harder, using no tension. Add Foreward, Backward, left and right Side Movements.
Now place elbows behind as far as possible, touching each other with fists pounding the chest. Add the Forward, Backward, left and right Side movements.
While elbows rest tightly against hips stretch forearms in front of you, upward and downward. Do this quickly and systematically. Add the Forward, Backward, left and right Side movements.
Finish up with last paragraphs in SET FIVE.
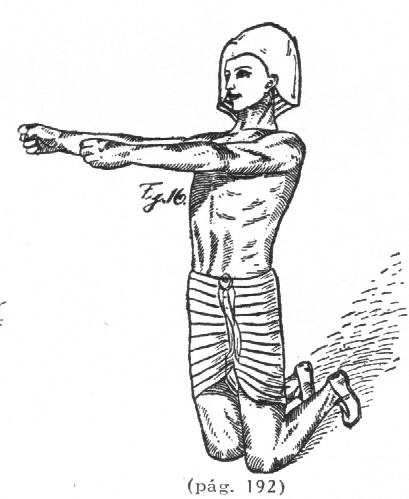
(Fig. 16) Kneeling position. Fits clenching. Arms thrown out in front but not tensing. The drawing out is effected from shoulder sockets, as if to strike a hard blow while perfectly relaxed.
Add the four movements of Forward, Backward, left and right Side, throwing both arms as far behind as possible, when taking the Forward movement; throw arms out in front of you when going through the Backward movement. In both of the Side movements the arms are to be thrown high above head.
Be sure to observe the humming of a tune or running off the musical scale while going through these exercises.
Go through the maneuver of Fig. 16 in standing position, adding the Forward, Backward, left and right Side movements, taking care that the chest is kept in an immovable position, yet exerting no tension. Watch yourself. Adjust your positions to as perfect lines as possible before going through the movements.
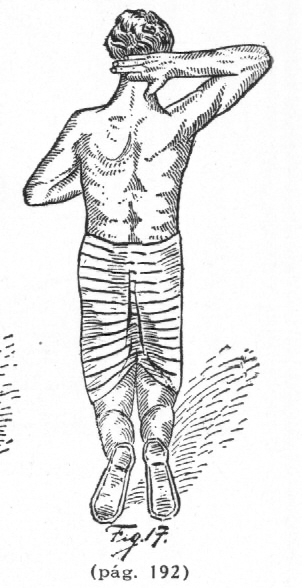
POSTURE SET TEN
(Fig. 17) Place bend in forefinger as given inILLUSTRATION of Hand 4 upon atlas, while forefinger of other hand rests upon chest. Now press fingers tightly into the parts touched, vibrating gently at first, gradually increasing the pressure to a vigorous point, immediately relaxing and reversing hands.
Having succeeded with the forefinger exercise, now use middlefinger, third and little finger, making sure that fingers not in use are kept in perfect line.
POSTURE SET ELEVEN
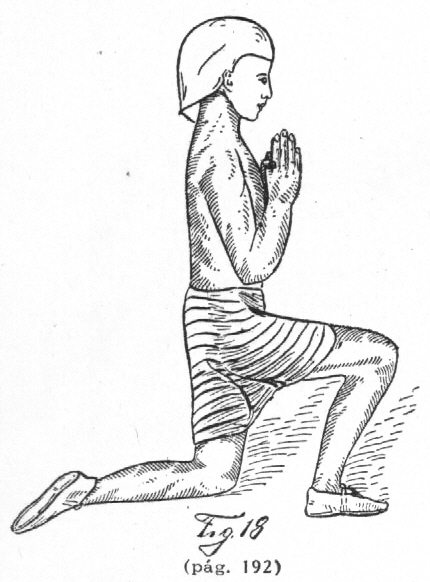
(Fig. 18) Kneel upon left knee; the right limb is placed on an angle. Place palms of hands tightly together; the left thumb placed over the right. Press hands tightly against the heart. Bend body forward, backward and either side. Reverse position of limbs.
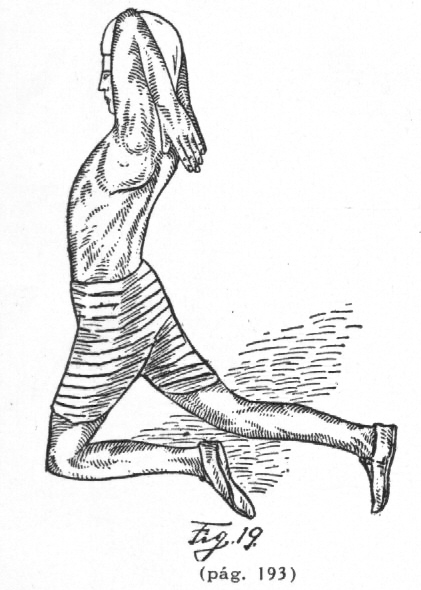
(Fig. 19) Place tightened hands behind so as to rest thumbs between shoulder blades. While left knee rests upon floor, stretch the right limb behind as far as possible. Take Forward, Backward, left and right Side movements. Now reverse limbs and go through same movements.
Keep hands in same position as above. Place right limb in front of you while left knee rests on floor. Go through Forward, Backward, left and right Side movements. Now reverse position of limbs and pass through the same movements.
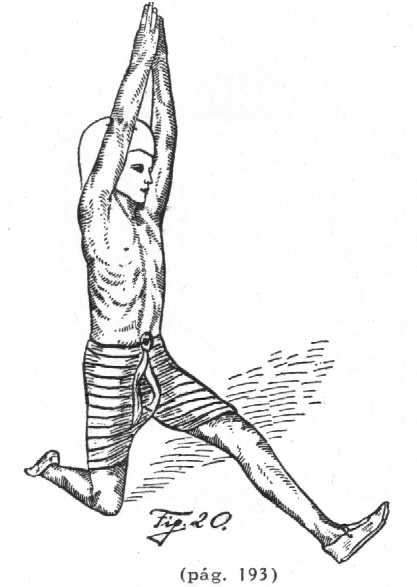
(Fig. 20) Place arms and hands high above head while the knee of one limb rests upon the floor, the other limb straightened out in front of you. Bend body Forward, Backward and either Side. Reverse the position of the limbs and go through the four movements.
Keep hands above head; right knee to floor; left limb in front of you; while humming or singing a sweet melody, Spenta Ainyahita preferred, draw the left limb slowly into an angle and gradually behind as in Fig. 19, returning limb to a position as in Fig. 18.
Now reverse positions of limbs; place left knee on the floor; set the right limb on an angle as in Fig. 18; keep hands high above head; now move right limb in front, back to an angle; move limb slowly as far behind as possible, and back to an angle as in Fig. 18.
Now take limb position as in Fig. 18 and arm position of Fig. 20. While moving the right limb in front of you bend body backward and return to limb position of Fig. 18. Move right limb as far behind as possible, while body and arms move forward. Reverse movements. Attempt Side movement with limbs moving into position as described.
POSITION SET TWELVE
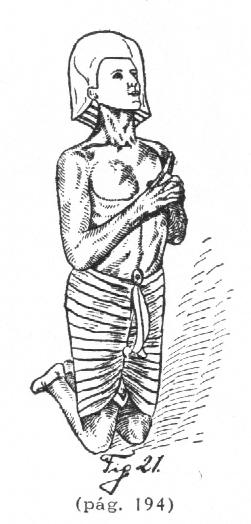
(Fig. 21) Kneeling position. Both elbows set tight into hips. Fold hands; one set of fingers at a time and until all fingers are folded. Clench hands tighter and tighter; draw them close to body: imploringly lift them up and away from body, swaying the body backward and forward, touching the floor while hands are held tightly to chest. Rising from this position separate the hands quickly and double your fists, placing the left over small of the back while with the right fist strike rigorously the chest nine times and cross your body by striking the forehead, left shoulder, right shoulder and the pit of the stomach.
POSITION SET THIRTEEN
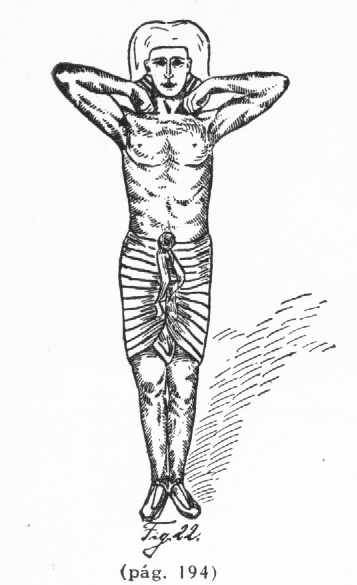
(Fig. 22) Take an erect position. Place fists upon shoulders. Dig them into the grooves. Keep elbows in perfect line. Bend the body forward as far as possible and immediately as far backward, quickly returning to the erect position. Knees must not move a hair breadth; the movements must be from the hips.
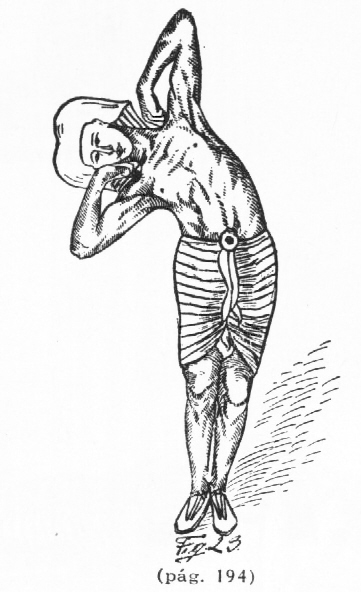
(Fig. 23) Position the same as Fig. 22. Upon humming bend body to one side and in so doing, gradually rise upon toe-tips. Draw up the body as if attempting to sever part upon part and bend to one side as if determined to touch the hip. Be sure that arms and elbows remain in perfect line as given in illustration.
As soon as one has become quite proficient in these movements it is well to sway the body rapidly from side to side, for a half a dozen times, always humming a tune or running off the musical scale.

POSTURE SET FOURTEEN
(Fig. 24) Procure two celluloid or poplar balls the size of walnuts and attach to them willow or any other elastic sticks, long enough to manipulate them with ease. Start working the spine as if sounding an Xylophone, starting with the little mallet to manipulate the one side of the spinal column from above, the other side from below, both mallets striking in concerted action, each attempting to reach the farthest end of the spinal column, working in opposite directions.
The kneeling erect position is to be taken first, followed by the forward bend, the backward and either side. In this way every part of the body may be touched up; lastly the arms, the thighs, calves and feet. The most awkward positions will prove most effective.
The benefits from this exercise alone will be so great that we fear the enmity of the Healing craft, but we hope that their largeness of heart and perfect culture of mind will out-balance these simple efforts.
POSTURE SET FIFTEEN
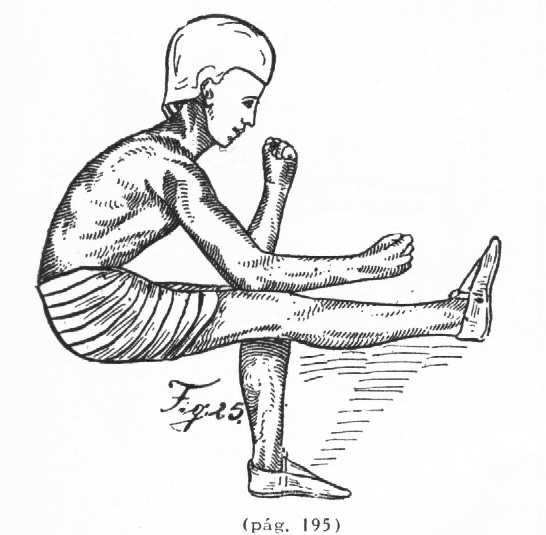
(Fig. 25) Take an imaginary sitting posture. At first you may have to use a toadstool seat. One limb remains on an angle, with foot placed flat upon the ground; the other limb is straigtened out in front, at first with foot supported against some convenient object, later on levitated. Place elbows upon knees, taking care not to curve the spine. While one arm remains perpendicular, the other is slowly placed horizontally. Now reverse the positions of the arms, and begin to swing arms alternately, slow at first, then more and more rapidly. When successful with movements while fisted, add the various finger exercises given inILLUSTRATION OF HANDS . (Page 211.)
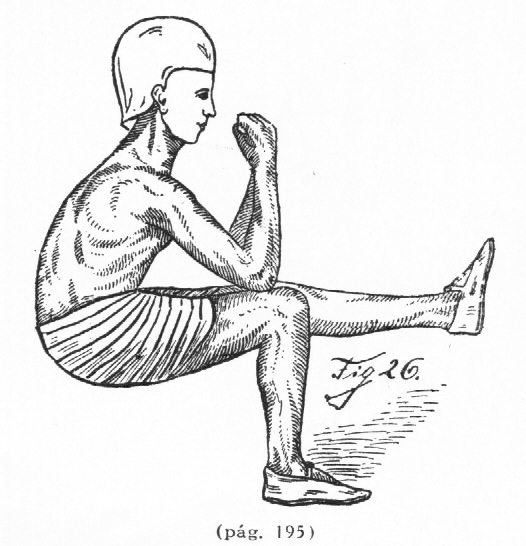
(Fig. 26) Position is like the former, only that the foot of the right limb is placed upon the floor, while the heel of the left rests upon a thin rod. The chest has to be raised to a high point to make the resting of the elbows upon knees possible and not curve the spine. With one fist at a time, at first, and then with both fists at the same time strike the shoulders slowly, and more swiftly as you gain more confidence in yourself.

POSTURE SET SIXTEEN
(Fig. 27) Kneel down. Draw shoulder blades tightly together. Place fists upon chest which bulges out to the utmost. Now raise your right foot slowly from floor and with the heel manipulate the sciatic nerve the same as if using a mallet. Having done so for at least a dozen times, drop foot slowly to the floor and raise the left foot until the heel touches the sciatic nerve, going through the same maneuvers as with the right foot.
After some time it will be possible to take this manipulating exercise while the trunk of the body sways forward and backward.
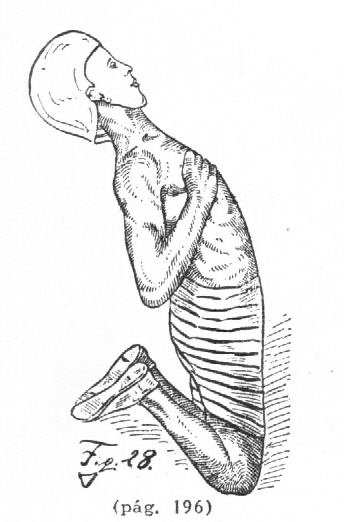
(Fig. 28) Kneeling position the same as in Fig. 27. Arms and fists in the same order. First lift the left foot with heel resting upon the sciatic nerve followed slowly by the right foot. Then lift the righ foot first and have the left foot follow. The difficulty in performing this exercise may be partly overcome by resting the back of the head against a solid railing, but care should be taken not to tense the muscles of the neck. One should study all the lines of this Posture first, as we would read over a difficult piece of music before attempting to execute it. The mind must go through it all and once the lines become vivid it will go a long ways toward realization of even the most difficult exercises. Humming a tune will aid greatly in checking tension. But during the performance of the most difficult part of the exercise the breath will be suspended.
POSTURE SET SEVENTEEN
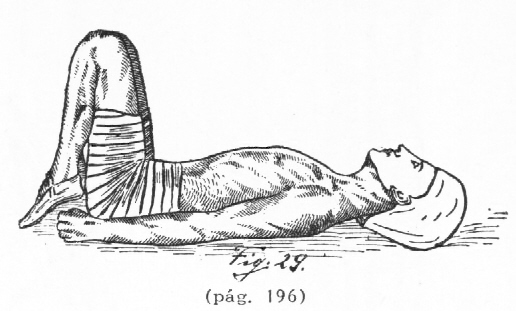
(Fig. 29) Lie down on back. Straighten out all of your body with chest raised high. While knees are being raised draw feet so close to body that heels touch the sciatic nerve and the toe-tips the floor. The arms remain relaxed while an effort is made to apparently pull them out of their sockets. The fists are tightly clenched. As soon as position seems to be satisfactorily adjusted the attempt is to be made to touch the knees with chin or forehead, immediately to return to original lying position. Three attempts to touch knees with chin will suffice within six hours.
POSTURE SET EIGHTEEN
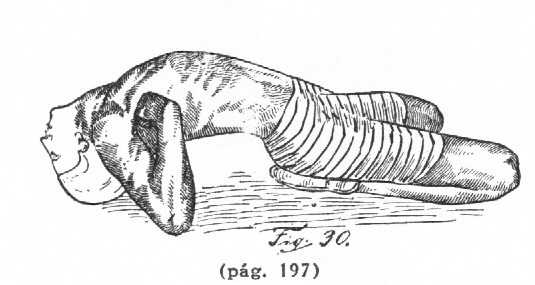
(Fig. 30) Kneel down. Bring fists to armpits. Now bend backwards slowly, keeping feet in close touch until the seat of the body rests within the soles of the feet and the head slowly and gently sinks into a few pillows and later, after several successful attempts, upon the floor.
The same position may be taken while fists are placed upon shoulders, later over-head and beside body as in Fig. 29.
POSTURE SET NINETEEN
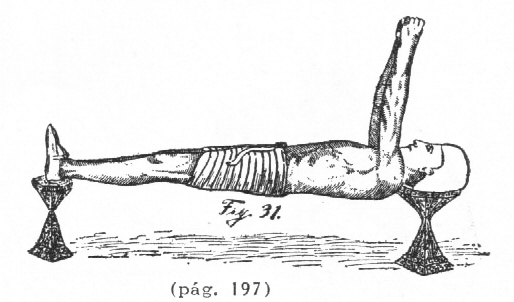
(Fig. 31) This position is to be practiced upon the floor at first, so as to insure perfect control of muscles. Learn to keep the kneecap well drawn in. Shoulder blades and arms must keep free from any support. Use several books for the support of the neck, grading the sizes of books in such a way that the smallest and narrowest book comes on top for the neck to rest upon. Use the same height for the heels to rest upon. After some practice neck and heels may rest upon a set of wooden railings and lastly upon earthenware vessels as the Egyptians used them. As soon as the body feels firm lift your arms, which until now hung beside the body. Be sure fists are properly clenched. As soon as arms stand perpendicular, slowly draw them higher as if attempting to pull them out of their sockets. This accomplished, move arms over-head, and until in a perfect horizontal line with the body. Now return arms to their perpendicular position and lastly draw arms beside the body. The limbs too, but only one limb at a time may be raised into a perpendicular position; lastly alternating with one foot and one arm at a time.
page principale
... mazdean science
...Health and breath culture
 ________________________________________